Plating in Stained Glass: Experience the beauty
| Plating in Stained Glass: Experience the beauty |
| Robert Oddy |
“Plating” is a piece of stained glass jargon. It refers to the practice of using more than one layer of glass in the construction of a panel. The layers are not fused together. They are simply stacked up, one on top of another and joined by soldering foil or came. I would like to spend a little time on the reasons for using this plating technique. In a future article I may say more about the techniques themselves, but the why’s are more important than the how’s.
The first thing we need to learn is that plating should only be used when a satisfactory effect cannot be produced with a single layer of well-chosen glass. Plating is time-consuming. It probably takes more than twice as long to make a two-layer part of a window as a single layer. And if you ever have to repair a plated panel, you will discover the true cost of plating! (See my article “The Fall and Rise of Owl” in Glass Patterns Quarterly, Vol 23, No 4, Winter 2007.)
 |
| Figure 1: Bamboo (1985) 24″ x 30″, Robert Oddy. |
| This window is heavily plated. |
Soon after I started doing stained glass, I learned about Tiffany’s extensive use of plating, and the idea intrigued me, so I tried it in some of my early windows. My first window, Bamboo, (Figure 1) is heavily plated, but not for the same reasons as Tiffany used plating. As often happens, I was swept away by my new tool, like a man who discovers a hammer for the first time, and tries to fix everything with it. Of course, plating, like any technique, requires practice and experience, so I do not regret spending time doing it, even if it was not strictly necessary.
So, what is plating good for? We can use it to combine the colors and textures of two or more types of glass, if we cannot find one product that has all that we want. We can create shading effects, making some parts of the panel darker than others. We can make lines and features less distinct by putting them on a second layer behind an opalescent piece that diffuses the lines. We can superimpose transparent features. Let’s look at each of these in turn.
Colors and Textures
 |
| Figure 2: Hibiscus (1993) 22″ x 31″, Robert Oddy. |
Several years ago, at a time when Spectrum had introduced only a few colors of waterglass, I made some olive green leaves in a panel by plating a light purple glass behind a green waterglass as in Figure 2, Hibiscus.
Just as olive water glass used to be hard to find so is a realistic skin tone color, especially the skin of an elephant god. I used a combination of solid pale pink opal and various shades of amber cathedral glass to produce a tanned skin color in Figure 3. If you have a glass that you particularly like, but you can’t find it in a ripple texture that you want, you can plate it with a clear ripple glass. Remember that the effect will vary, depending on which glass is on the front – test the effect before you commit yourself.
Shading
 |
| Figure 3: Lord of Hurdles (2000) |
| detail, Robert Oddy. |
Plating gray cathedral glass behind most shades of glass can darken the color. There are several shades of gray. Figure 4 shows a part of my window “Seville.” The shading on the tower and the shadows of the buildings and boats cast by the sun are implemented with gray glass plated on a second layer.
Softening lines
 |
| Figure 4: Seville (2009) detail |
| Robert Oddy |
Lead lines, or soldered copper foil lines, make for sharp silhouettes in a panel. Sometimes a softer line is more effective, for the outline of a distant mountain, for example. This can be achieved by incorporating this detail into a second layer of glass behind an opalescent glass which diffuses the lines. I frequently use Youghiogheny’s ice white stipple glass as a diffuser. The colors are all in the second layer, and are not affected by the ice white, except to soften them. In Dogwood Scroll, part of which is shown in Figure 5, the foothills are outlined in the second layer, the distant mountains are painted on the second layer, and the waterfall is a clear granite texture glass, all plated behind ice white stipple glass.
Transparency effects
 |
| Figure 5: Dogwood Scroll (2007) |
| detail, Robert Oddy. |
Charles Rennie Mackintosh was a Scottish architect and artist who was prominent around the turn of the 20th century. A small series of pencil and watercolor pictures of wildflowers that he made with his wife, Margaret Macdonald Mackintosh, captivated me. An example is shown in Figure 6. Each flower, leaf and stem is drawn, but not all are colored, and many of the lines that would normally be hidden are visible. The flowers appear transparent, and very delicate.
 |
| Figure 6: Spurge, Withyham (1909), pencil & watercolour, |
| Charles Rennie Mackintosh & Margaret Macdonald Mackintosh. |
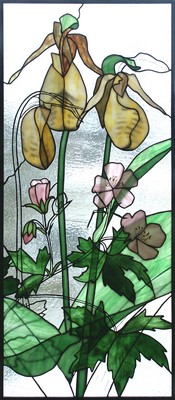
Mackintosh proved to be an inspiration. In a number of my panels, I have tried to achieve a similar effect, and plating is a useful technique for this purpose. Hibiscus (Figure 2) was an early one, and Wildflowers (Figure 7) is a more recent window. In Wildflowers you can see the outlines of some of the features through the leaves and flowers in front, just as in the Mackintosh paintings, and some of the elements are not colored. In some places, this is done by attaching a second layer of glass behind the first; in other places a copper foil overlay is used.
Fusing
 |
| Figure 7: Wildflowers (2006) |
| detail, Robert Oddy. |
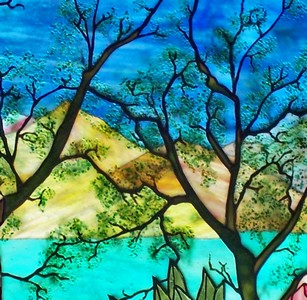
Quite recently, I found a new use for plating. I wanted to fuse frit into pieces of opalescent art glass (not types that are claimed to be “fusible”). The fusing process frequently changes the opalescent glass significantly. Colors change and the opacity can increase dramatically. To solve this problem, I fuse the frit into a piece of clear glass and plate this on top of the opalescent glass. The trees in Figure 8 are made with frit and black glass powder, fused into pieces of ice white glass, plated on top of colored glass for the background.
 |
| Figure 8: Rhododendron (2009) detail, Robert Oddy. |
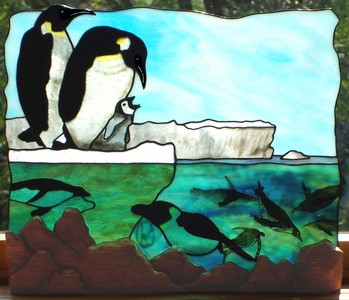
Plating can also accent movement as shown in Figure 9 in this small ornamental piece depicting penguins in Antarctica. I used plating to give the impression of penguins swimming under the water and around the ice flow. The water is two layers of glass: on top is ice white ripple, and under that is a blue-green art glass. The larger swimming penguins are part of the second layer. The black parts are pieces of glass cut and incorporated into that layer. They are quite distinct, but are seen through the ripples of the ice white glass. The other swimming penguins are painted onto the colored glass in the second layer, some on the front and others on the back, so that the amount of diffusion varies.
 |
| Figure 9: Penguins (2008) ornament |
| with carved wood, 14″ x 12″, Robert Oddy. |
Plating requires care and attention to detail. If pieces in different layers are not lined up accurately, the lines can appear very thick, which detracts from the artwork. Whenever you intend to plate, you should test the glass combinations by holding them up to the light. The effects are not always what you might expect. Combining sheets of glass is not like mixing paints, glass acts as filter.
Plating is a tool that is well worth mastering because it makes some beautiful effects possible. When I teach workshops on creating the illusion of depth in stained glass work, people sometimes say “Ah! You are going teach us how to do plating.” But two layers of glass don’t equal depth. No! A sense of depth is an artistic illusion. It doesn’t matter how it is created; in fact, it should not be obvious to a viewer standing a few feet away how it was created. Plating is not the only way to create a sense of depth. It is one tool among many – keep its use in proportion!
web: www.robertoddy.com | mail: artist@RobertOddy.com | phone: (315) 200-2260
